Session-Based Trading Strategy: London & New York Kill Zones Explained

In forex trading, timing is just as important as strategy. Many traders focus only on setups and indicators but ignore when the market is most active. The forex market operates 24 hours, but not all hours are equal. Certain sessions provide higher liquidity, stronger moves, and better trading opportunities. This is where session-based trading becomes powerful. Understanding London and New York kill zones can help traders enter the market at the right time with higher probability. This is where session based trading forex, london session strategy, and new york kill zone trading become essential. Professional traders do not trade all day. They focus on specific time windows when institutional activity is highest. These time windows are known as kill zones. By mastering session based trading forex, london session strategy, and new york kill zone trading, traders can improve accuracy and avoid unnecessary trades. What is Session-Based Trading in Forex Session-based trading refers to analyzing and trading the market based on different trading sessions. The forex market is divided into major sessions: Asian, London, and New York. Each session has unique characteristics. The Asian session is generally slow, while the London and New York sessions are more volatile and active. Understanding these sessions helps traders choose the best time to trade. This concept is central to session based trading forex, london session strategy, and new york kill zone trading. What are Kill Zones in Forex Kill zones are specific time periods within trading sessions when the market experiences high liquidity and volatility. These are the times when institutions are most active. The most active trading windows are typically seen during the London and New York sessions, where market movement and volatility create stronger trading opportunities. Kill zones are not random. They are based on institutional trading behavior and market overlaps. This makes session based trading forex, london session strategy, and new york kill zone trading highly effective. London Kill Zone Explained The London session is one of the most important trading sessions. It usually starts with a strong move as liquidity enters the market. The London kill zone typically occurs in the early hours of the London session. During this time, price often makes significant moves, breaking key levels and setting the tone for the day. This session is known for creating liquidity sweeps and strong trends. Traders who understand session based trading forex, london session strategy, and new york kill zone trading can take advantage of these moves. New York Kill Zone Explained The New York session overlaps with the London session, creating one of the most volatile periods in the market. The New York kill zone occurs during the opening hours of the New York session. This period often continues the London trend or creates reversals. High-impact news events are also released during this time, adding to volatility. Understanding session based trading forex, london session strategy, and new york kill zone trading helps traders navigate this session effectively. Why Kill Zones Work Kill zones work because they represent periods of high institutional activity. During these times, large players enter the market, creating strong price movements. Liquidity is highest during these sessions, making it easier for institutions to execute trades. This leads to clearer trends and better setups. This behavior is a key part of session based trading forex, london session strategy, and new york kill zone trading. Session Timing and Market Behavior Each session has a unique behavior. The Asian session often creates a range. The London session tends to break that range, and the New York session either continues or reverses the move. Understanding this cycle helps traders anticipate market movements. It also prevents them from trading during low-probability times. This cycle is essential for mastering session based trading forex, london session strategy, and new york kill zone trading. London Session Trading Strategy A common strategy during the London session is trading the breakout of the Asian range. Price often consolidates during the Asian session and breaks out during London. Traders can identify the high and low of the Asian session and watch for breakouts during the London kill zone. Confirmation is important. Traders should wait for structure breaks or strong momentum before entering trades. This approach aligns with session based trading forex, london session strategy, and new york kill zone trading. New York Session Trading Strategy The New York session offers opportunities for both continuation and reversal trades. If the London session establishes a strong trend, the New York session often continues that trend. However, it can also create reversals, especially after liquidity sweeps. Traders should analyze the London session and look for setups during the New York kill zone. This strategy is part of session based trading forex, london session strategy, and new york kill zone trading. Combining Kill Zones with Smart Money Concepts Kill zones become more powerful when combined with smart money concepts such as liquidity sweeps, order blocks, and fair value gaps. For example, a trader may identify a liquidity sweep during the London kill zone and enter a trade based on confirmation. This combination increases accuracy and provides high-probability setups. It is a core part of session based trading forex, london session strategy, and new york kill zone trading. Multi-Timeframe Analysis in Session Trading Using multiple timeframes improves session-based trading. Higher timeframes provide the overall trend, while lower timeframes offer precise entry points during kill zones. This approach ensures that trades are aligned with the market direction. It enhances session based trading forex, london session strategy, and new york kill zone trading. Risk Management in Session Trading Risk management is essential. Traders should not overtrade during kill zones, even though opportunities are higher. Stop losses should be placed at logical levels, and position sizes should be controlled. Maintaining a proper risk reward ratio ensures long-term profitability. This complements session based trading forex, london session strategy, and new york kill zone trading. Common Mistakes Traders Make Many traders make mistakes such as trading outside kill zones, overtrading, and ignoring market context. Another
Liquidity & Stop Hunting in Forex: How Big Players Trap Retail Traders

The forex market is often seen as a battlefield where retail traders try to predict price movements using indicators and signals. However, behind every price movement lies a deeper mechanism controlled by institutions, banks, and large players often referred to as smart money. Understanding how these players operate is essential for survival and long-term profitability. One of the most critical yet misunderstood concepts in trading is liquidity and stop hunting. These mechanisms explain why price often moves against retail traders before going in the expected direction. This is where liquidity trading strategy, smart money concept, and forex market manipulation come into play. Most retail traders believe that the market moves randomly, but in reality, price moves with a purpose. That purpose is liquidity. Institutions require large volumes to execute their trades, and they cannot enter or exit positions without sufficient liquidity. This leads to engineered price movements that target areas where retail traders place their stop losses. By understanding liquidity trading strategy, smart money concept, and forex market manipulation, traders can shift from being victims to becoming aligned with institutional flow. Understanding Liquidity in Forex Market Liquidity refers to the availability of buyers and sellers in the market. In simple terms, it is the ease with which trades can be executed without significantly affecting price. In the forex market, liquidity is highest during major sessions such as London and New York. However, the real importance of liquidity lies in where it is located, not just when it is available. Liquidity is often found above highs and below lows. Retail traders tend to place stop losses in predictable locations such as above resistance or below support. These areas become liquidity pools. Institutions target these zones to fill their large orders. This is the foundation of liquidity trading strategy, smart money concept, and forex market manipulation. When price approaches these liquidity zones, it often spikes suddenly, triggering stop losses and breakout traders. This creates the necessary volume for institutions to enter trades in the opposite direction. Understanding this behavior helps traders avoid common traps and align with the real market direction. What is Stop Hunting in Forex Stop hunting is a process where price deliberately moves to trigger stop losses placed by retail traders. It is not a random event but a calculated move by large players to gather liquidity. When many traders place their stops at similar levels, it creates an opportunity for institutions to push price into those zones. Once stops are triggered, a surge of orders enters the market. This provides the liquidity needed for institutions to execute their positions. After collecting liquidity, price often reverses sharply. This is why many traders experience being stopped out before the market moves in their predicted direction. This behavior is deeply connected with liquidity trading strategy, smart money concept, and forex market manipulation. Stop hunting is most common near key levels such as support and resistance, trendlines, and psychological levels. Traders who understand this concept can avoid placing their stops in obvious locations and instead position themselves strategically. Why Smart Money Needs Liquidity Smart money refers to institutional traders such as banks, hedge funds, and large financial entities. These players operate with massive capital, which requires significant liquidity to enter and exit trades. Unlike retail traders, they cannot simply click buy or sell without impacting the market. To solve this problem, institutions create liquidity by pushing price into areas where retail orders are concentrated. This is often done through stop hunts and false breakouts. Once liquidity is collected, they execute their trades and drive the market in the intended direction. This process highlights the importance of liquidity trading strategy, smart money concept, and forex market manipulation. Understanding this concept changes the way traders view the market. Instead of chasing price, they begin to anticipate where liquidity is located and how institutions might use it. Types of Liquidity in Forex There are two main types of liquidity in the forex market: buy-side liquidity and sell-side liquidity. Buy-side liquidity exists above highs where stop losses of short sellers are placed. Sell-side liquidity exists below lows where stop losses of buyers are located. Institutions target both types of liquidity depending on their market bias. For example, if smart money wants to buy, they may first push price down to collect sell-side liquidity before moving price upward. This concept is a core part of liquidity trading strategy, smart money concept, and forex market manipulation. Equal highs and equal lows are also important liquidity zones. These levels attract retail traders who expect breakouts. However, institutions often use these levels to trap traders before reversing the market. Market Structure and Liquidity Connection Market structure plays a crucial role in understanding liquidity. Trends are formed by higher highs and higher lows in an uptrend and lower highs and lower lows in a downtrend. However, before continuing a trend, price often retraces to collect liquidity. For example, in an uptrend, price may temporarily move downward to trigger sell-side liquidity before continuing upward. This movement often confuses retail traders, leading them to believe that the trend has reversed. In reality, it is just a liquidity grab. This behavior aligns with liquidity trading strategy, smart money concept, and forex market manipulation. Break of structure and change of character are also important signals. A break of structure confirms trend continuation, while a change of character may indicate a reversal. Both concepts are influenced by liquidity. Common Stop Hunting Patterns There are several patterns that indicate stop hunting activity. One of the most common is the false breakout. In this pattern, price breaks a key level, attracting breakout traders, and then quickly reverses. Another common pattern is the liquidity sweep. This occurs when price moves beyond a previous high or low, triggers stop losses, and then reverses direction. These patterns are essential for traders using liquidity trading strategy, smart money concept, and forex market manipulation. Wicks on candlesticks often reveal stop hunts. Long wicks indicate rejection and liquidity collection. Traders who learn to
Multi-Timeframe Analysis Strategy: Align Higher TF Bias with Precision Entries
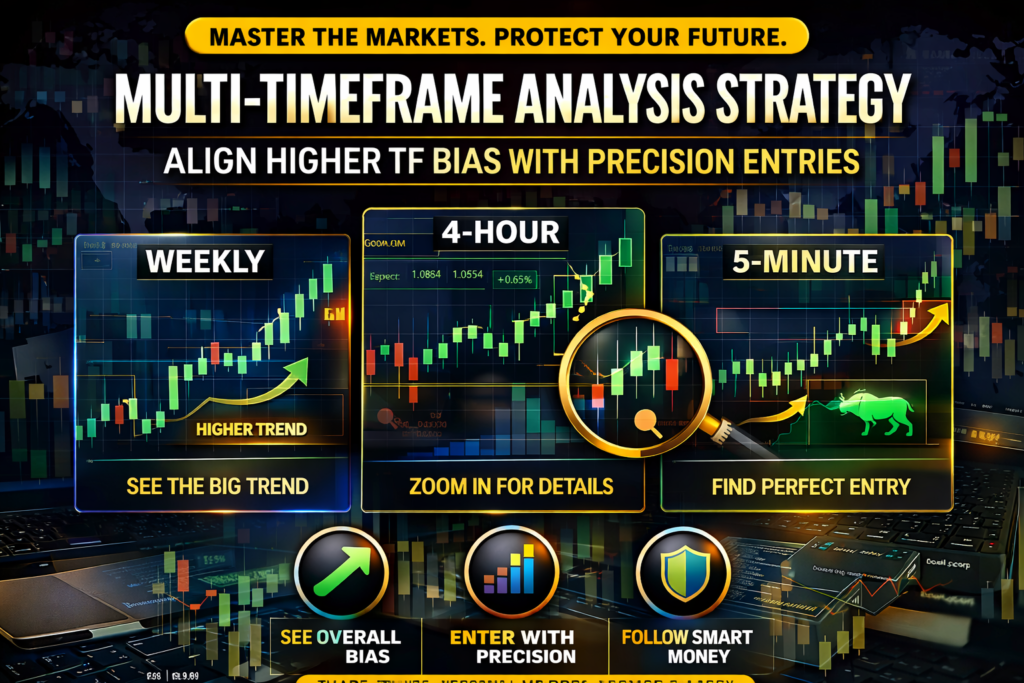
In forex trading, one of the biggest mistakes traders make is focusing on a single timeframe. This often leads to confusion, poor entries, and inconsistent results. Professional traders do not rely on just one chart; they analyze multiple timeframes to understand the complete market picture. This approach is known as multi-timeframe analysis. It allows traders to align with the overall trend while executing precise entries. This is where multi timeframe analysis forex, higher timeframe bias, and lower timeframe entries become essential. The market moves in layers. Higher timeframes show the bigger picture, while lower timeframes reveal detailed movements. By combining both, traders can improve accuracy and reduce risk. Understanding multi timeframe analysis forex, higher timeframe bias, and lower timeframe entries helps traders move from random trading to a structured approach. What is Multi-Timeframe Analysis Multi-timeframe analysis is the process of analyzing the same market across different timeframes. It helps traders understand both the overall trend and short-term price movements. For example, a trader may use the daily chart to identify the main trend and the 15-minute chart to find entry points. This combination provides clarity and precision. This method is a core part of multi timeframe analysis forex, higher timeframe bias, and lower timeframe entries. It ensures that trades are aligned with the broader market direction. Why Multi-Timeframe Analysis is Important Trading without proper market context is similar to navigating blindly without direction. Smaller timeframes usually include a lot of market noise and misleading movements that can confuse traders. Higher timeframes provide a clearer view of the market. They show strong trends, key levels, and institutional activity. By combining timeframes, traders can filter out bad trades and focus on high-probability setups. This is why multi timeframe analysis forex, higher timeframe bias, and lower timeframe entries are crucial for consistent trading. Understanding Higher Timeframe Bias Higher timeframe bias refers to the overall direction of the market based on larger timeframes such as daily or 4-hour charts. If the higher timeframe shows an uptrend, traders should look for buying opportunities. If it shows a downtrend, they should focus on selling. This bias acts as a guide for trading decisions. It prevents traders from going against the trend. Understanding higher timeframe bias is essential in multi timeframe analysis forex, higher timeframe bias, and lower timeframe entries. Role of Lower Timeframe Entries Lower timeframes such as 15-minute or 5-minute charts are used for precise entries. They help traders find optimal entry points with smaller stop losses. While higher timeframes provide direction, lower timeframes provide timing. This combination improves risk reward ratio and accuracy. Using lower timeframe entries effectively is a key part of multi timeframe analysis forex, higher timeframe bias, and lower timeframe entries. Top-Down Analysis Approach Top-down analysis is the most effective way to apply multi-timeframe analysis. It involves starting from higher timeframes and moving down to lower ones. First, identify the trend on the higher timeframe. Then, mark key levels such as support, resistance, and liquidity zones. Finally, move to lower timeframes to find entry signals. This structured approach aligns with multi timeframe analysis forex, higher timeframe bias, and lower timeframe entries. Combining Market Structure Across Timeframes Market structure should be analyzed across multiple timeframes. A higher timeframe uptrend may contain lower timeframe pullbacks. Traders must understand that lower timeframe reversals do not always mean a higher timeframe trend change. By aligning structures, traders can avoid confusion and improve decision-making. This concept is central to multi timeframe analysis forex, higher timeframe bias, and lower timeframe entries. Using Order Blocks and FVG in Multi-Timeframe Analysis Order blocks and Fair Value Gaps become more powerful when used across timeframes. Higher timeframe order blocks act as strong zones of interest. Lower timeframe FVGs provide precise entry points within those zones. This combination increases accuracy and reduces risk. It is an advanced application of multi timeframe analysis forex, higher timeframe bias, and lower timeframe entries. Entry Strategy with Multi-Timeframe Analysis A successful entry strategy involves patience and confirmation. First, identify the higher timeframe bias. Then, wait for price to reach a key level. Switch to a lower timeframe and look for confirmation such as liquidity sweeps, break of structure, or rejection candles. Enter the trade only after confirmation. This approach aligns with multi timeframe analysis forex, higher timeframe bias, and lower timeframe entries. Risk Management with Multi-Timeframe Trading Multi-timeframe analysis improves risk management. Lower timeframe entries allow tighter stop losses, which reduces risk. At the same time, higher timeframe targets provide larger profit potential. This creates a favorable risk reward ratio. Proper risk management is essential when applying multi timeframe analysis forex, higher timeframe bias, and lower timeframe entries. Common Mistakes Traders Make Many traders misuse multi-timeframe analysis. One common mistake is overcomplicating the process by using too many timeframes. Another mistake is ignoring higher timeframe bias and focusing only on lower timeframe signals. Some traders also switch timeframes frequently, leading to confusion and inconsistency. Avoiding these mistakes is crucial for mastering multi timeframe analysis forex, higher timeframe bias, and lower timeframe entries. Best Timeframe Combinations Choosing the right timeframe combination is important. Swing traders may use daily and 4-hour charts for bias and 1-hour charts for entries. Intraday traders may use 1-hour charts for bias and 5-minute charts for entries. The key is to maintain a clear structure without overcomplicating the analysis. This supports multi timeframe analysis forex, higher timeframe bias, and lower timeframe entries. Psychology Behind Multi-Timeframe Trading Multi-timeframe analysis helps reduce emotional trading. When traders have a clear plan, they are less likely to make impulsive decisions. It also builds confidence by providing a structured approach. Traders know why they are entering a trade and what to expect. This psychological stability is an important part of multi timeframe analysis forex, higher timeframe bias, and lower timeframe entries. Advantages of Multi-Timeframe Analysis This approach provides a complete view of the market. It improves accuracy, reduces risk, and enhances decision-making. It also helps traders align with institutional flow and avoid false signals. These advantages
Liquidity Sweeps & Inducement: How Smart Money Creates Fake Moves

In the forex market, price movements are not random. Behind every move, there is intent driven by institutional players who control large volumes of capital. Retail traders often get trapped in false moves, believing they are trading breakouts or trend continuations, only to see the market reverse against them. These traps are not accidents but part of a structured approach used by smart money. Two key concepts that explain this behavior are liquidity sweeps and inducement. Understanding these concepts can completely change how you see the market. This is where liquidity sweep trading, inducement in forex, and smart money traps become essential. Most traders lose money because they follow obvious patterns. They buy breakouts, sell breakdowns, and place stop losses at predictable levels. Institutions exploit this predictable behavior to create liquidity. By mastering liquidity sweep trading, inducement in forex, and smart money traps, traders can stop being victims and start trading with the market instead of against it. What is Liquidity in Forex Liquidity refers to the availability of buy and sell orders in the market. It is the fuel that allows institutions to execute large trades. Without liquidity, big players cannot enter or exit positions efficiently. Liquidity is commonly found above highs and below lows because retail traders place their stop losses in these areas. These zones become targets for institutions. This concept forms the foundation of liquidity sweep trading, inducement in forex, and smart money traps. When price reaches these liquidity zones, it often reacts sharply. This reaction is not random but a result of large orders being executed. What is a Liquidity Sweep A liquidity sweep occurs when price moves beyond a key level to trigger stop losses and pending orders. This creates a surge of liquidity, allowing institutions to execute their trades. For example, price may move above a previous high, triggering buy stops and breakout trades. After collecting liquidity, price often reverses sharply. This is known as a liquidity sweep. Liquidity sweeps are one of the most common patterns in the market. They are a core part of liquidity sweep trading, inducement in forex, and smart money traps. What is Inducement in Forex Inducement is a strategy used by smart money to lure retail traders into taking positions in the wrong direction. It creates a false sense of opportunity. For example, price may form a pattern that looks like a strong breakout setup. Retail traders enter trades expecting continuation. However, this move is designed to attract liquidity, not to continue the trend. Once enough traders are trapped, institutions reverse the market. This concept is central to liquidity sweep trading, inducement in forex, and smart money traps. Difference Between Liquidity Sweep and Inducement Liquidity sweep and inducement are closely related but serve different purposes. A liquidity sweep is the act of collecting stop losses and orders, while inducement is the process of attracting traders into those positions. Inducement happens before the sweep. It builds liquidity by encouraging traders to enter positions. The sweep then collects that liquidity. Understanding this sequence is crucial for applying liquidity sweep trading, inducement in forex, and smart money traps effectively. Why Smart Money Creates Fake Moves Institutions need liquidity to execute large trades. They cannot simply enter positions without causing major price disruptions. To solve this, they create fake moves that attract retail traders. These moves generate the liquidity needed for institutions to operate. Once liquidity is collected, the real move begins. This process highlights the importance of liquidity sweep trading, inducement in forex, and smart money traps. Common Patterns of Liquidity Sweeps There are several patterns that indicate liquidity sweeps. One of the most common is the false breakout. Price breaks a key level and quickly reverses. Another pattern is the double top or double bottom sweep. Price takes out equal highs or lows before reversing direction. Long wicks on candlesticks also indicate liquidity sweeps. These wicks show rejection and strong institutional activity. Recognizing these patterns is essential for mastering liquidity sweep trading, inducement in forex, and smart money traps. How Inducement Traps Retail Traders Inducement works by creating convincing setups that attract traders. These setups often align with common trading strategies such as breakouts or trend continuation. Retail traders enter these trades without realizing they are being positioned against smart money. Once enough traders are trapped, the market reverses. This cycle repeats continuously in the market. Understanding this behavior is key to liquidity sweep trading, inducement in forex, and smart money traps. Liquidity Sweeps and Market Structure Liquidity sweeps often occur at key points in market structure. For example, before a trend continues, price may sweep liquidity to remove weak hands. In an uptrend, price may move downward to sweep sell-side liquidity before continuing upward. In a downtrend, the opposite happens. This behavior aligns with liquidity sweep trading, inducement in forex, and smart money traps and helps traders understand the true direction of the market. Entry Strategy After Liquidity Sweep One of the best ways to trade liquidity sweeps is to wait for confirmation after the sweep occurs. When price takes out a key level and shows rejection, it often signals a reversal. Traders can enter trades in the direction opposite to the sweep. For example, if price sweeps highs and then rejects, traders can look for selling opportunities. This approach is part of liquidity sweep trading, inducement in forex, and smart money traps. Using Inducement for Better Entries Instead of falling into inducement traps, traders can use inducement to their advantage. By identifying areas where traders are likely to enter, you can anticipate where liquidity will be created. This allows you to position yourself in alignment with smart money rather than against it. Understanding inducement improves timing and accuracy. It is a key component of liquidity sweep trading, inducement in forex, and smart money traps. Multi-Timeframe Approach Using multiple timeframes enhances the effectiveness of liquidity-based trading. Higher timeframes provide the overall trend and key liquidity zones. Lower timeframes offer precise entry points after sweeps and inducement. This
Break of Structure vs Change of Character: Advanced Market Structure Secrets
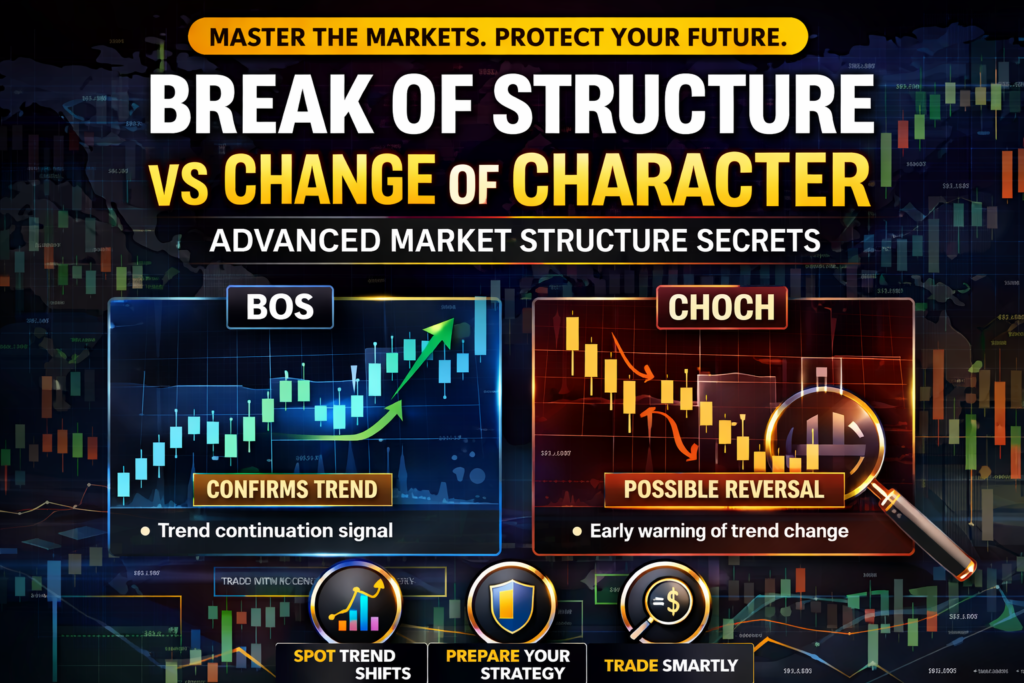
Understanding market structure is one of the most powerful skills in forex trading. While many traders rely on indicators, professional traders focus on how price moves. Two of the most important concepts in advanced price action are Break of Structure (BOS) and Change of Character (CHOCH). These concepts help traders identify trend continuation and potential reversals with high accuracy. This is where break of structure trading, change of character forex, and smart money market structure become essential. Most traders fail because they cannot correctly read the market. They enter trades without understanding whether the market is trending or reversing. BOS and CHOCH provide clarity by showing the underlying strength or weakness in price movement. By mastering break of structure trading, change of character forex, and smart money market structure, traders can align themselves with institutional flow. What is Market Structure in Forex Market structure refers to the way price forms highs and lows over time. It helps traders identify whether the market is in an uptrend, downtrend, or range. In a rising market, price typically creates a pattern of stronger peaks and higher pullbacks, showing buyer dominance. In a falling market, the opposite happens, where each move forms weaker highs and deeper lows, indicating selling pressure. When the market lacks direction, price tends to move within a range without any clear trend. Understanding market structure is the foundation of break of structure trading, change of character forex, and smart money market structure. Without it, traders are essentially guessing the market direction. What is Break of Structure (BOS) Break of Structure (BOS) occurs when price breaks a significant previous high or low in the direction of the trend. It confirms that the current trend is continuing. For example, in an uptrend, when price breaks a previous high, it confirms bullish continuation. In a downtrend, when price breaks a previous low, it confirms bearish continuation. BOS is a confirmation signal. It tells traders that the trend is still strong and likely to continue. This concept is a key part of break of structure trading, change of character forex, and smart money market structure. What is Change of Character (CHOCH) Change of Character (CHOCH) acts as an initial indication that the current market trend may be losing strength and could shift direction. It appears when price starts breaking key structural levels against the existing trend, suggesting a possible shift in control. For instance, during an upward trend, if price fails to maintain its structure and drops below a recent higher low, it may signal weakening momentum. Likewise, in a downward trend, breaking above a recent lower high can hint at a possible shift toward bullish movement. CHOCH does not confirm a reversal but provides an early warning. It is a crucial concept in break of structure trading, change of character forex, and smart money market structure. Difference Between BOS and CHOCH The main difference between BOS and CHOCH lies in their purpose. Break of Structure (BOS) supports the continuation of the existing trend, whereas CHOCH suggests that the market may be preparing for a directional change. BOS happens in the direction of the trend, while CHOCH occurs against the trend. BOS provides confidence to stay in a trade, while CHOCH alerts traders to prepare for a potential change. Understanding this difference is essential for applying break of structure trading, change of character forex, and smart money market structure effectively. Why BOS and CHOCH Matter BOS and CHOCH help traders understand market intent. Instead of guessing, traders can rely on price action to make decisions. These concepts also reduce emotional trading. When traders follow structure, they are less likely to make impulsive decisions. By using break of structure trading, change of character forex, and smart money market structure, traders can improve accuracy and consistency. BOS in Trend Continuation Strategy In a trending market, BOS is used to confirm continuation. Traders look for pullbacks after a BOS to enter trades in the direction of the trend. For example, after a bullish BOS, traders wait for price to retrace to a support level or order block before entering a buy trade. This approach aligns with break of structure trading, change of character forex, and smart money market structure. CHOCH in Reversal Strategy CHOCH is used to identify potential reversals. When a CHOCH occurs, traders should be cautious and look for additional confirmation. For example, after a CHOCH in an uptrend, traders may wait for a bearish BOS to confirm the reversal before entering sell trades. This step-by-step approach improves decision-making and aligns with break of structure trading, change of character forex, and smart money market structure. Combining BOS and CHOCH for Precision The real power of these concepts comes from using them together. CHOCH provides early warning, while BOS confirms the move. For example, a trader may first see a CHOCH indicating a potential reversal. Then, a BOS in the new direction confirms the trend change. This combination creates high-probability setups and is a core principle of break of structure trading, change of character forex, and smart money market structure. Market Structure and Liquidity Connection Liquidity plays a major role in BOS and CHOCH. Before breaking structure, price often sweeps liquidity by taking out previous highs or lows. This liquidity grab provides the fuel for the next move. After collecting liquidity, price breaks structure and continues in the intended direction. Understanding this relationship enhances break of structure trading, change of character forex, and smart money market structure. Multi-Timeframe Analysis with BOS and CHOCH Using multiple timeframes improves accuracy. Higher timeframes provide the overall trend, while lower timeframes offer precise entries. For example, a trader may identify a bullish trend on the daily chart and then use the 15-minute chart to find BOS and CHOCH for entry. This approach increases precision and reduces risk. It is a key part of break of structure trading, change of character forex, and smart money market structure. Entry Strategy Using BOS and CHOCH A proper entry strategy involves waiting for
Fair Value Gaps (FVG) Trading Strategy: Identify Imbalances Like Pro Traders
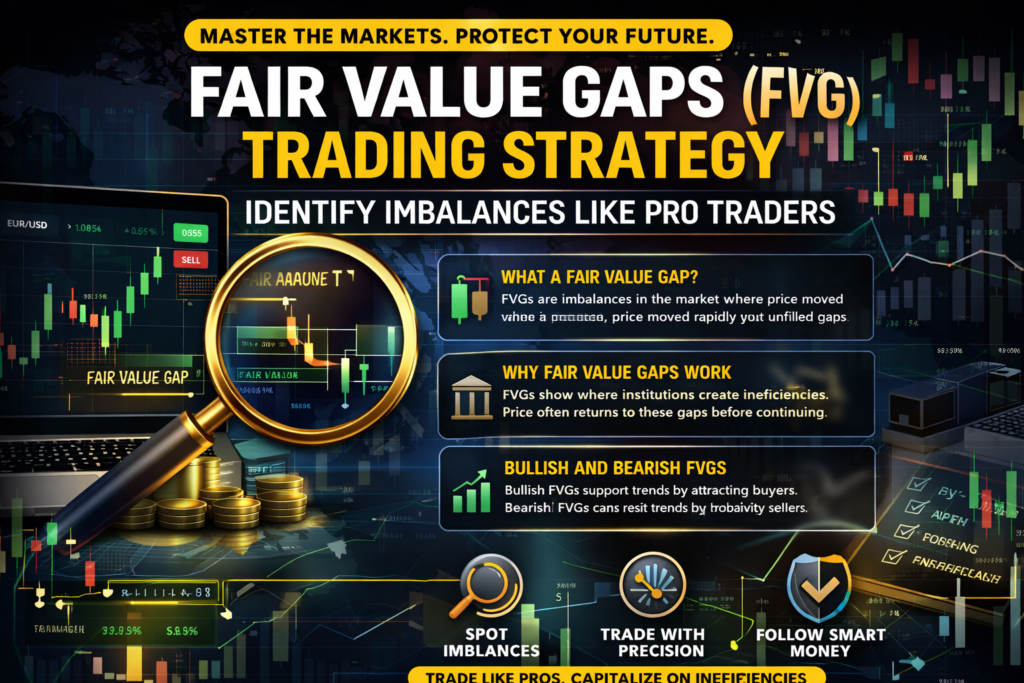
In the forex market, price does not move randomly. Every movement is driven by imbalance between buyers and sellers. When institutions enter the market with large orders, they create inefficiencies in price delivery. These inefficiencies are known as Fair Value Gaps (FVG). Understanding how to identify and trade these gaps can significantly improve your trading performance. This is where fair value gap trading strategy, smart money concept, and price imbalance trading become essential. Retail traders often focus on indicators, but professional traders pay attention to price inefficiencies. Fair Value Gaps reveal where the market has moved too quickly, leaving behind areas that price may revisit. These zones act like magnets, attracting price back before continuing the trend. By mastering fair value gap trading strategy, smart money concept, and price imbalance trading, traders can align themselves with institutional behavior. What is a Fair Value Gap (FVG) A Fair Value Gap is a three-candle pattern that represents an imbalance in the market. It occurs when the price moves so aggressively that it leaves a gap between candles. In simple terms, an FVG forms when the high of the first candle and the low of the third candle do not overlap with the middle candle. This creates a gap or inefficiency in price. This gap indicates that the market did not trade efficiently in that area. Institutions often revisit these zones to rebalance price before continuing in the intended direction. This concept is a core part of fair value gap trading strategy, smart money concept, and price imbalance trading. Why Fair Value Gaps Work Fair Value Gaps work because they represent areas of strong institutional activity. When large players enter the market, they create rapid price movements that leave behind imbalances. Price tends to return to these imbalances because the market seeks efficiency. This process is known as rebalancing. Once the gap is filled, price often continues in the original direction. This behavior makes FVGs powerful tools for identifying high-probability trade setups. It is one of the key principles of fair value gap trading strategy, smart money concept, and price imbalance trading. Types of Fair Value Gaps Fair Value Gaps are generally classified into two categories: bullish gaps and bearish gaps. A bullish FVG forms during an upward move and acts as a potential support zone. Traders look for buying opportunities when price returns to this gap. A bearish FVG forms during a downward move and acts as a resistance zone. Traders look for selling opportunities when price revisits the gap. Understanding these types is important for applying fair value gap trading strategy, smart money concept, and price imbalance trading effectively. How to Identify a Valid FVG Not every gap is a high-quality setup. Traders must learn to identify valid Fair Value Gaps. A strong FVG is usually created by a large impulsive move. It often breaks market structure, indicating institutional involvement. It also aligns with higher timeframe trends. Fresh FVGs that have not been revisited tend to be more reliable. The cleaner the gap, the higher the probability of price reacting to it. These criteria are essential for mastering fair value gap trading strategy, smart money concept, and price imbalance trading. FVG and Market Structure Connection Fair Value Gaps become significantly more effective when they are used alongside overall market structure. During an upward trend, bullish FVG zones offer better opportunities, while in a downward trend, bearish gaps tend to perform more effectively. Market structure helps determine the overall direction, while FVGs provide precise entry zones. This combination increases the probability of successful trades. Break of structure and change of character also play a role in confirming trends and reversals. These concepts are closely linked with fair value gap trading strategy, smart money concept, and price imbalance trading. Entry Strategy Using FVG A proper entry strategy is essential for trading FVGs. Traders should not enter trades immediately when price reaches the gap. First, identify the trend using higher timeframe analysis. Then, mark key FVG zones on the chart. Wait for price to return to the gap and observe price action. Look for confirmation such as rejection candles, liquidity sweeps, or structure shifts. Once confirmation is seen, enter the trade with proper risk management. This approach aligns with fair value gap trading strategy, smart money concept, and price imbalance trading. FVG with Liquidity and Stop Hunting Fair Value Gaps often work in combination with liquidity zones. Before entering an FVG, price may sweep liquidity by taking out previous highs or lows. This liquidity grab provides the necessary orders for institutions to enter trades. After collecting liquidity, price moves into the FVG and reacts. Understanding this relationship enhances the effectiveness of fair value gap trading strategy, smart money concept, and price imbalance trading. Multi-Timeframe Analysis for FVG Using multiple timeframes improves accuracy in FVG trading. Larger timeframes help traders understand the main market direction and important zones, whereas smaller timeframes are used to fine-tune entries with better accuracy. For example, a trader may identify a bullish FVG on the 4-hour chart and then look for entry confirmation on the 5-minute chart. This approach increases precision and reduces risk. Multi-timeframe analysis is a key component of fair value gap trading strategy, smart money concept, and price imbalance trading. Stop Loss and Take Profit Strategy Proper risk management is essential when trading FVGs. Stop losses should be placed beyond the gap to avoid being triggered by minor price movements. Take profit levels can be set at previous highs or lows, liquidity zones, or key support and resistance levels. Maintaining a good risk reward ratio ensures long-term profitability. This is an important aspect of fair value gap trading strategy, smart money concept, and price imbalance trading. Common Mistakes in FVG Trading Many traders make mistakes when trading Fair Value Gaps. One common mistake is trading every gap without confirmation. Another mistake is ignoring market structure. Trading against the trend reduces accuracy and increases risk. Overtrading and poor risk management are also common issues. Traders must be
Order Blocks & Institutional Footprints: How Smart Money Builds Positions
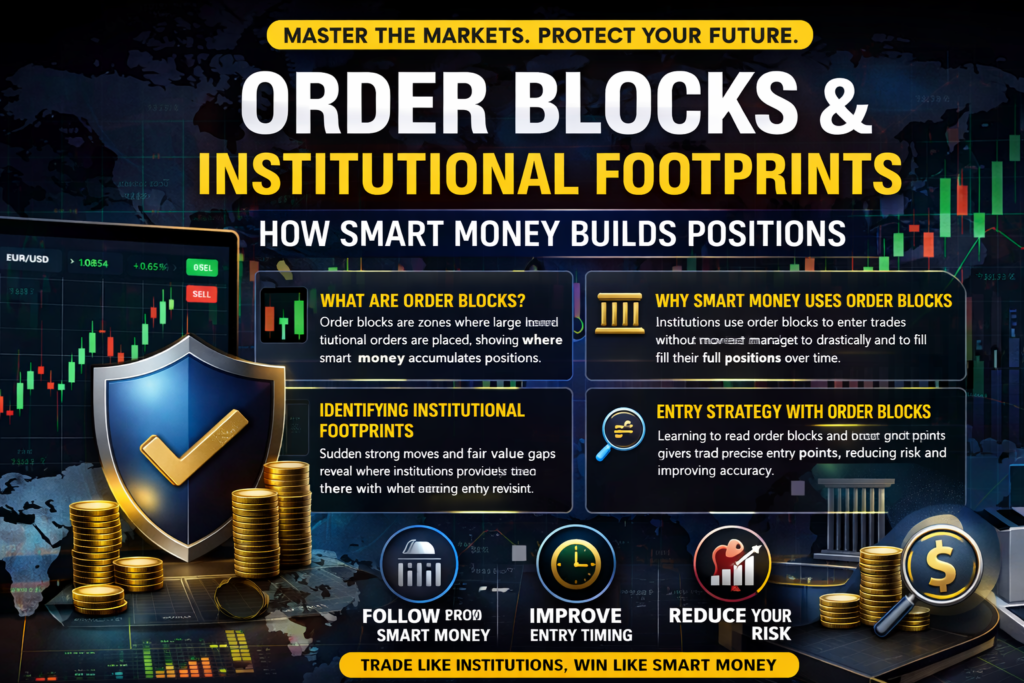
In the forex market, most retail traders rely on indicators, signals, and lagging tools to make trading decisions. However, professional traders and institutions operate in a completely different way. They focus on price behavior, liquidity, and areas where large orders are executed. One of the most powerful concepts in smart money trading is order blocks. Understanding how institutions build positions through order blocks and footprints can completely transform your trading approach. This is where order block trading strategy, smart money concept, and institutional trading footprints become essential. The market does not move randomly. Every strong move you see on the chart is backed by institutional activity. Banks and hedge funds cannot place their full orders at once, so they accumulate positions over time. These accumulation zones leave behind footprints on the chart, which traders can learn to identify. By understanding order block trading strategy, smart money concept, and institutional trading footprints, traders can align themselves with the real drivers of the market. What Are Order Blocks in Forex Order blocks are zones where large institutional orders are placed. These areas represent the last bullish or bearish candle before a strong impulsive move in the opposite direction. They indicate where smart money has entered the market. For example, in a bullish scenario, an order block is the last bearish candle before a strong upward move. This shows that institutions accumulated buy positions before pushing price higher. Similarly, in a bearish scenario, the last bullish candle before a strong drop represents a bearish order block. Order blocks are not just random zones; they are areas of high importance where price is likely to react in the future. This concept is central to order block trading strategy, smart money concept, and institutional trading footprints. Why Order Blocks Work Order blocks work because they represent institutional activity. Unlike retail traders, institutions have the power to move the market. When they enter positions, they leave behind evidence in the form of strong price movements. Price often returns to these order blocks because institutions may not have filled all their orders initially. When price revisits these zones, they continue building positions. This creates high-probability trading opportunities. This behavior is a key part of order block trading strategy, smart money concept, and institutional trading footprints. Understanding why order blocks work helps traders trust the concept and apply it with confidence. Types of Order Blocks There are mainly two types of order blocks: bullish order blocks and bearish order blocks. A bullish order block forms before a strong upward move, while a bearish order block forms before a strong downward move. Bullish order blocks are used for buying opportunities. When price returns to this zone, traders look for confirmation to enter long positions. Bearish order blocks are used for selling opportunities. Another classification includes mitigation blocks and breaker blocks. These advanced concepts help refine entries and improve accuracy. All these variations fall under order block trading strategy, smart money concept, and institutional trading footprints. Institutional Footprints in the Market Institutional footprints are clues left behind by large players. These include strong impulsive moves, liquidity sweeps, and imbalances. These footprints reveal where institutions have entered the market. One of the most common footprints is a sudden strong move with large candles. This indicates heavy buying or selling pressure. Another footprint is the presence of fair value gaps, which show imbalance between buyers and sellers. By learning to identify these footprints, traders can understand the intentions of smart money. This is a core principle of order block trading strategy, smart money concept, and institutional trading footprints. How Smart Money Builds Positions Smart money does not enter the market randomly. They follow a structured process. First, they identify liquidity zones where retail traders are likely to place orders. Then, they manipulate price to trigger those orders. Once liquidity is collected, institutions begin building their positions. This process is called accumulation or distribution. It often happens within order blocks. After building positions, smart money drives the market in the intended direction. This entire cycle is the foundation of order block trading strategy, smart money concept, and institutional trading footprints. Order Blocks and Market Structure Order blocks are closely linked with market structure. In an uptrend, traders should focus on bullish order blocks, while in a downtrend, bearish order blocks are more relevant. Market structure helps traders determine the overall trend, while order blocks provide precise entry points. Combining these two concepts increases the probability of successful trades. Break of structure and change of character also play an important role. A break of structure confirms trend continuation, while a change of character may indicate a reversal. These concepts work together with order block trading strategy, smart money concept, and institutional trading footprints. How to Identify High-Quality Order Blocks Not all order blocks are equal. High-quality order blocks have certain characteristics. They are usually followed by strong impulsive moves, indicating institutional involvement. They often break market structure, showing that the trend is changing or continuing. They also align with higher timeframe levels, increasing their importance. Fresh order blocks, which have not been revisited, tend to be more reliable. These factors help traders identify the best setups using order block trading strategy, smart money concept, and institutional trading footprints. Entry Strategy Using Order Blocks A proper entry strategy is essential for success. Traders should not enter trades blindly when price reaches an order block. Confirmation is important. First, identify the trend using market structure. Then, mark key order blocks on the chart. Wait for price to return to these zones. Look for confirmation signals such as rejection candles, lower timeframe structure shifts, or liquidity sweeps. Once confirmation is observed, enter the trade with proper risk management. This approach aligns with order block trading strategy, smart money concept, and institutional trading footprints. Stop Loss and Take Profit Placement Stop loss placement is crucial in order block trading. Stops should be placed beyond the order block to avoid being triggered by minor fluctuations. Take profit levels
Risk Management in Forex: How to Protect Your Capital and Grow Consistently
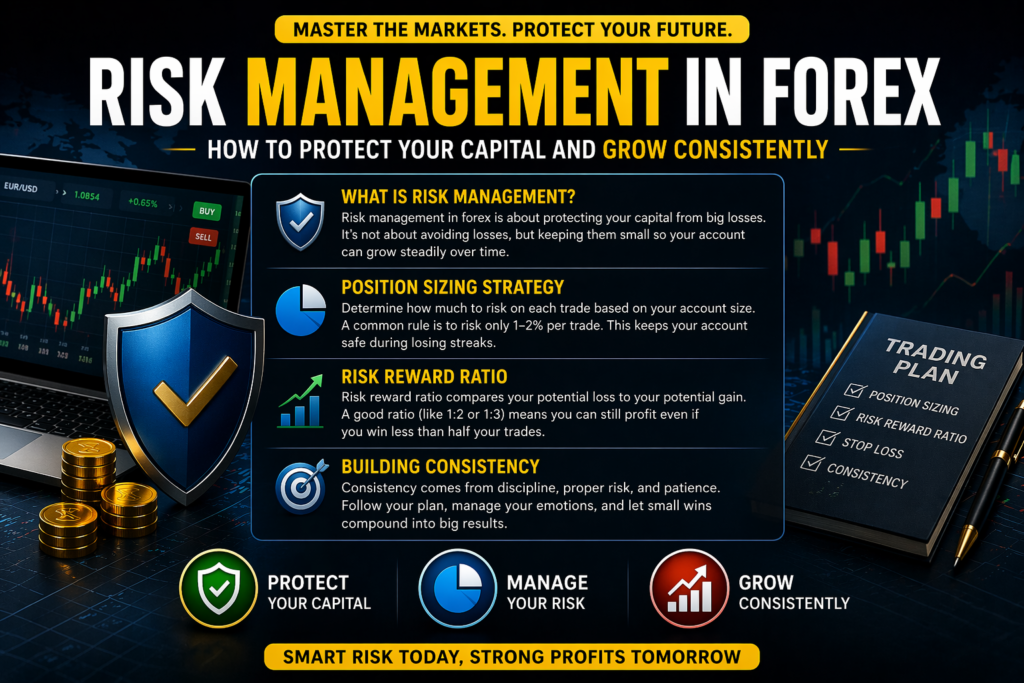
In the world of forex trading, most beginners focus only on finding the perfect strategy, entry point, or indicator. However, the truth is that even the best strategy will fail without proper risk management. Professional traders understand that protecting capital is more important than making profits. This is why risk management in forex, position sizing strategy, and risk reward ratio are considered the foundation of long-term success. Many traders lose their accounts not because they lack knowledge, but because they ignore risk. A single bad trade with high risk can wipe out weeks or months of profits. On the other hand, traders who focus on managing risk can survive losing streaks and still grow their accounts steadily. This shift in mindset separates amateurs from professionals. What is Risk Management in Forex Risk management in forex refers to the process of controlling potential losses in trading. It involves setting rules that protect your trading capital from large drawdowns. Instead of focusing on how much you can make, risk management focuses on how much you can lose safely. Every trade carries uncertainty. No strategy guarantees 100 percent accuracy. This is why traders must accept losses as part of the game. By applying risk management in forex, position sizing strategy, and risk reward ratio, traders can ensure that losses remain small while profits grow over time. The goal is not to avoid losses but to control them. When losses are controlled and profits are allowed to run, overall account growth becomes consistent. Why Risk Management is More Important Than Strategy Many traders spend years searching for the perfect strategy but ignore risk management. This is a major mistake. Even a strategy with a low win rate can be profitable with proper risk management, while a high win rate strategy can fail without it. For example, a trader winning 40 percent of trades can still make money if their risk reward ratio is strong. On the other hand, a trader winning 80 percent of trades can lose everything if they risk too much per trade. This is why professional traders prioritize risk management in forex, position sizing strategy, and risk reward ratio over entry signals. Strategy gives you entries, but risk management keeps you in the game. Understanding Position Sizing in Forex Position sizing is the process of determining how much capital to risk on a single trade. It is one of the most powerful tools in trading but often overlooked by beginners. Instead of randomly choosing lot sizes, professional traders calculate their position size based on account balance and risk percentage. This ensures that each trade carries a controlled level of risk. This concept is essential in risk management in forex, position sizing strategy, and risk reward ratio. For example, if you have a trading account of 1000 dollars and risk 1 percent per trade, you are risking only 10 dollars. This means even after multiple losses, your account remains safe. Position sizing allows traders to stay consistent and avoid emotional decision-making. How to Calculate Position Size Position size depends on three factors: account size, risk percentage, and stop loss distance. By combining these elements, traders can calculate the exact lot size for each trade. If your stop loss is wide, your position size should be smaller. If your stop loss is tight, your position size can be larger. This balance ensures that risk remains constant across all trades. This calculation is a core part of risk management in forex, position sizing strategy, and risk reward ratio. It helps traders maintain discipline and avoid overexposure. Many trading platforms provide position size calculators, making this process easier for beginners. Risk Per Trade: The Golden Rule One of the most important rules in trading is limiting risk per trade. Most professional traders risk between 1 percent to 2 percent of their account on a single trade. Risking more than this increases the chances of blowing the account during losing streaks. Even a small series of losses can become dangerous if risk is too high. By following risk management in forex, position sizing strategy, and risk reward ratio, traders can survive losing streaks and continue trading confidently. Consistency in risk leads to consistency in results. Understanding Risk Reward Ratio The risk reward ratio compares the potential loss of a trade with its expected profit. This balance plays a major role in determining whether a trading strategy can remain profitable over the long run. For example, a 1:2 risk reward ratio means you risk 1 unit to gain 2 units. A trader does not need to win every trade to succeed. With a strong risk-to-reward setup, fewer winning trades can still generate overall profits. This concept is essential in risk management in forex, position sizing strategy, and risk reward ratio. It shifts the focus from win rate to overall profitability. Traders should always look for setups that offer favorable risk reward ratios. This improves long-term performance. Why Risk Reward Ratio Matters Many traders focus only on winning trades, but winning alone does not guarantee profit. What matters is how much you win compared to how much you lose. A trader with a 50 percent win rate and a 1:2 risk reward ratio can grow their account consistently. On the other hand, a trader with a 70 percent win rate but a poor risk reward ratio may still lose money. This is why risk management in forex, position sizing strategy, and risk reward ratio are interconnected. Together, they create a strong foundation for trading success. Combining Position Sizing and RR Ratio The real power of trading comes from combining position sizing with risk reward ratio. These two concepts work together to control risk and maximize returns. Position sizing ensures that each trade carries a fixed level of risk, while risk reward ratio ensures that profits outweigh losses. This combination creates a positive expectancy. By applying risk management in forex, position sizing strategy, and risk reward ratio, traders can achieve steady growth without taking unnecessary risks. Common Risk
Price Action Trading Strategy: How to Read Market Structure Like Smart Money

Introduction In the world of forex trading, many beginners rely heavily on indicators, signals, and complicated strategies. However, professional traders and institutional players focus on something much simpler yet more powerful—price itself. This is where the concept of a Price Action Trading Strategy comes into play. Price action trading is the art of reading raw price movements directly from the chart without relying on lagging indicators. The main reason why price action is so effective is because it reflects real market behavior. Every movement on the chart represents buying and selling decisions made by traders around the world. Instead of depending on indicators that react after the move has already happened, price action helps traders understand what is happening in real time. Whether you are a beginner trying to understand the basics or an experienced trader looking to refine your approach, mastering price action can transform your trading journey. It teaches you how to read the market like smart money and make decisions based on logic rather than emotions. What is Price Action Trading? Price action trading is a method of analyzing the market by studying past and current price movements. It focuses on candlestick patterns, support and resistance levels, and overall market structure. Unlike indicator-based trading, price action removes unnecessary complexity and allows traders to focus on what truly matters—the price. This approach is widely used by professional traders because it provides a clear understanding of market behavior. Instead of waiting for indicators to give signals, traders can directly interpret price movements and anticipate future direction. Price action is not just a strategy; it is a skill. It requires observation, patience, and practice. Over time, traders learn to recognize patterns, understand market psychology, and identify high-probability setups. Understanding Market Structure One of the most important concepts in price action trading is Market Structure Trading. Market structure helps traders identify the overall direction of the market and determine whether the trend is bullish, bearish, or sideways. In an uptrend, the market forms a series of higher highs and higher lows. This indicates that buyers are in control and pushing prices upward. Traders look for buying opportunities in such conditions. In a downtrend, the market creates lower highs and lower lows. This shows that sellers are dominating the market, and traders focus on selling opportunities. In a sideways or ranging market, price moves within a defined range without a clear direction. This is where many traders make mistakes by trying to trade trends that do not exist. Understanding market structure allows traders to align themselves with the trend rather than trading against it. This simple concept can significantly improve trading accuracy and consistency. Support and Resistance: The Foundation of Price Action Support and resistance are key levels where price tends to react. Support is a level where buying pressure is strong enough to prevent the price from falling further. Resistance is a level where selling pressure stops the price from rising. These levels act as decision zones for traders. When price approaches support, traders look for buying opportunities. When price reaches resistance, they look for selling opportunities. Support and resistance are not exact lines but zones where price reacts. The more times price touches these levels, the stronger they become. Another important concept is the role reversal of these levels. When resistance is broken, it often becomes support. Similarly, when support is broken, it can turn into resistance. This concept is widely used in trading strategies. Break of Structure Explained The concept of Break of Structure Forex is crucial for understanding trend continuation. A break of structure occurs when price breaks a significant previous high or low. In an uptrend, when price breaks the previous high, it confirms that the trend is continuing. This gives traders confidence to enter buy trades. In a downtrend, when price breaks the previous low, it confirms bearish continuation. Traders then look for selling opportunities. Break of structure is important because it provides confirmation rather than assumption. Instead of guessing where the market might go, traders wait for confirmation before entering a trade. Change of Character (CHOCH) Change of Character is an advanced concept that indicates a possible trend reversal. It occurs when the market breaks its previous structure in the opposite direction. For example, in an uptrend, if price starts forming lower highs and breaks a previous low, it signals that the trend may be changing. This is an early sign that sellers are gaining control. Similarly, in a downtrend, if price forms higher lows and breaks a previous high, it suggests a potential bullish reversal. This concept helps traders identify trend reversals early and avoid getting trapped in losing trades. Entry Strategy Using Price Action A successful price action strategy is based on patience and confirmation. Traders do not enter trades randomly; they wait for clear setups. First, identify the market structure. Determine whether the market is trending or ranging. Second, mark important support and resistance levels. These are areas where price is likely to react. Third, wait for confirmation. This can be in the form of rejection candles, break and retest patterns, or strong momentum moves. Finally, enter the trade with proper risk management. The key rule is simple: wait, confirm, and then enter. Risk Management in Price Action Trading No trading strategy is complete without proper risk management. Even the best traders in the world focus more on protecting their capital than making profits. Stop loss placement is crucial. In price action trading, stop losses are usually placed below support in buy trades and above resistance in sell trades. Risk-to-reward ratio is another important factor. Traders should aim for at least a 1:2 ratio, meaning they risk one unit to gain two units. Position sizing helps control risk. Traders should never risk a large portion of their capital on a single trade. Proper risk management ensures long-term survival in the market. Common Mistakes Traders Make Many traders fail not because of lack of knowledge but because of common mistakes. One major
ADX Indicator Explained: How to Measure Trend Strength and Avoid False Signals
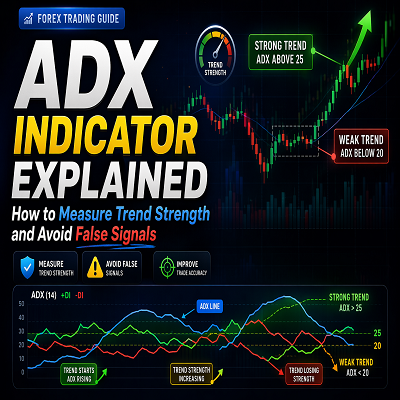
Forex trading is not only about identifying whether the market is moving up or down, but also about understanding how strong that movement is. Many traders enter trades based on direction alone and end up facing losses because the trend lacks strength. This is where the ADX indicator becomes extremely important. The Average Directional Index, commonly known as ADX, is designed to measure the strength of a trend, helping traders avoid weak market conditions and focus only on high-probability opportunities. In the fast-paced forex market, false signals are one of the biggest challenges traders face. Indicators may suggest a buy or sell opportunity, but without proper confirmation of trend strength, these signals often fail. ADX helps solve this problem by filtering out weak trends and highlighting strong ones. This makes it an essential tool for traders who want consistency and better decision-making. What is ADX Indicator? The ADX indicator is a technical analysis tool developed by J. Welles Wilder. It is part of a broader system known as the Directional Movement System, which includes two additional lines called the Positive Directional Indicator (+DI) and the Negative Directional Indicator (-DI). The +DI and –DI indicators are used together with ADX to determine the market’s direction. The ADX line moves between 0 and 100. A low value indicates a weak or non-existent trend, while a high value indicates a strong trend. One of the unique aspects of ADX is that it does not tell you whether the market is bullish or bearish. Instead, it tells you whether the trend, regardless of direction, is strong enough to trade. How ADX Works in Forex Trading The ADX indicator works by analyzing price movements and calculating the strength of directional movement. It compares the difference between highs and lows over a specific period and determines whether the market is trending or ranging. When the ADX value starts increasing, it means that the trend is gaining strength. When the ADX value starts decreasing, it indicates that the trend is weakening. This information helps traders decide whether to stay in a trade, exit a position, or avoid trading altogether. The +DI and -DI lines work alongside ADX to show direction. When +DI is above -DI, it suggests bullish strength. When -DI is above +DI, it indicates bearish strength. Using these indicators together allows traders to evaluate both the trend direction and its overall strength more clearly. Understanding ADX Levels Interpreting ADX levels correctly is essential for making effective trading decisions. An ADX reading under 20 generally shows that the market is moving sideways without a clear trend. During these conditions, trend-based strategies tend to perform poorly due to the lack of a strong directional move. An ADX value between 20 and 40 often signals that a new trend is developing. This is a phase where traders start preparing for potential opportunities. When the ADX crosses above 40, it reflects a powerful and well-established trend. This is typically the best time to apply trend-following strategies. However, extremely high ADX values may indicate that the trend is overextended. In such cases, traders should be cautious as the market may slow down or reverse. Importance of +DI and -DI Lines While ADX measures trend strength, the +DI and -DI lines provide direction. These lines help traders understand whether buyers or sellers are dominating the market. When the +DI line crosses above the -DI line, it indicates that buyers are gaining control and the market may move upward. When the -DI line crosses above the +DI line, it suggests that sellers are in control and the market may move downward. These crossovers can act as entry signals, especially when supported by a rising ADX. However, traders should avoid relying solely on crossovers, as they can sometimes produce false signals in weak markets. ADX Trend Strength Strategy One of the most effective ways to use ADX is to focus on trading only when the trend is strong. Traders can set a rule to enter trades only when ADX is above a certain level, such as 20 or 25. For example, if ADX is above 25 and the +DI line is above the -DI line, it indicates a strong uptrend. In this case, traders look for buying opportunities. Similarly, if ADX is above 25 and the -DI line is above the +DI line, it indicates a strong downtrend, and traders look for selling opportunities. This strategy helps traders avoid low-quality trades and focus on strong market movements. Using ADX to Avoid False Signals False signals are one of the biggest reasons traders lose money. Many indicators generate signals even when the market is not trending, leading to unnecessary losses. ADX acts as a filter that helps traders avoid such situations. If ADX is below 20, it indicates that the market is weak, and traders may choose to stay out of the market. By waiting for ADX to rise before entering trades, traders can significantly improve their accuracy and reduce risk. ADX Breakout Confirmation Strategy ADX is also useful for confirming breakouts. When the market is in a consolidation phase, ADX values are usually low. When a breakout occurs, ADX starts to rise, indicating that the trend is gaining strength. Traders can use this behavior to confirm whether a breakout is valid. A breakout with rising ADX is more likely to continue, while a breakout with low ADX may fail. This approach helps traders avoid false breakouts and enter trades with greater confidence. Combining ADX with Moving Averages Combining ADX with moving averages creates a powerful trading strategy. Moving averages help identify trend direction, while ADX confirms the strength of that trend. For example, if the price is above a moving average and ADX is rising, it indicates a strong uptrend. Traders can use this confirmation to enter buy trades. This combination improves trade accuracy and reduces false signals. ADX Divergence Concept Although not as commonly used as RSI divergence, ADX divergence can provide valuable insights. If the price is making higher highs