
Introduction
The Forex market is full of institutional trading concepts that help traders understand how smart money operates. Among these concepts, the Breaker Block is one of the most powerful tools used by traders following Smart Money Concepts (SMC) and ICT (Inner Circle Trader) methodologies.
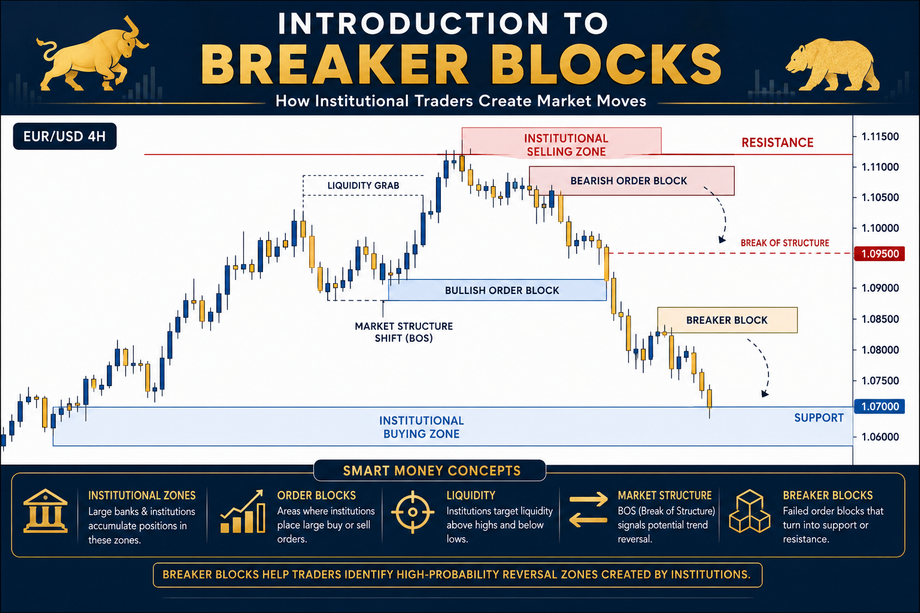
A Breaker Block is essentially a failed Order Block that transforms into a new support or resistance zone after market structure changes. It represents an area where institutional traders may have trapped retail traders before reversing the market direction.
Many traders struggle because they enter trades too early or fail to identify where major market reversals may occur. Understanding Breaker Blocks can help traders identify high-probability entries, improve risk-to-reward ratios, and trade alongside institutional market participants.
In this article, we will explore the concept of Breaker Blocks in detail, understand their formation, analyze examples, and learn how to use them effectively in Forex trading.
Understanding Market Structure
Before learning Breaker Blocks, traders must understand market structure.
The market generally moves in three ways:
- Uptrend
- Downtrend
- Range
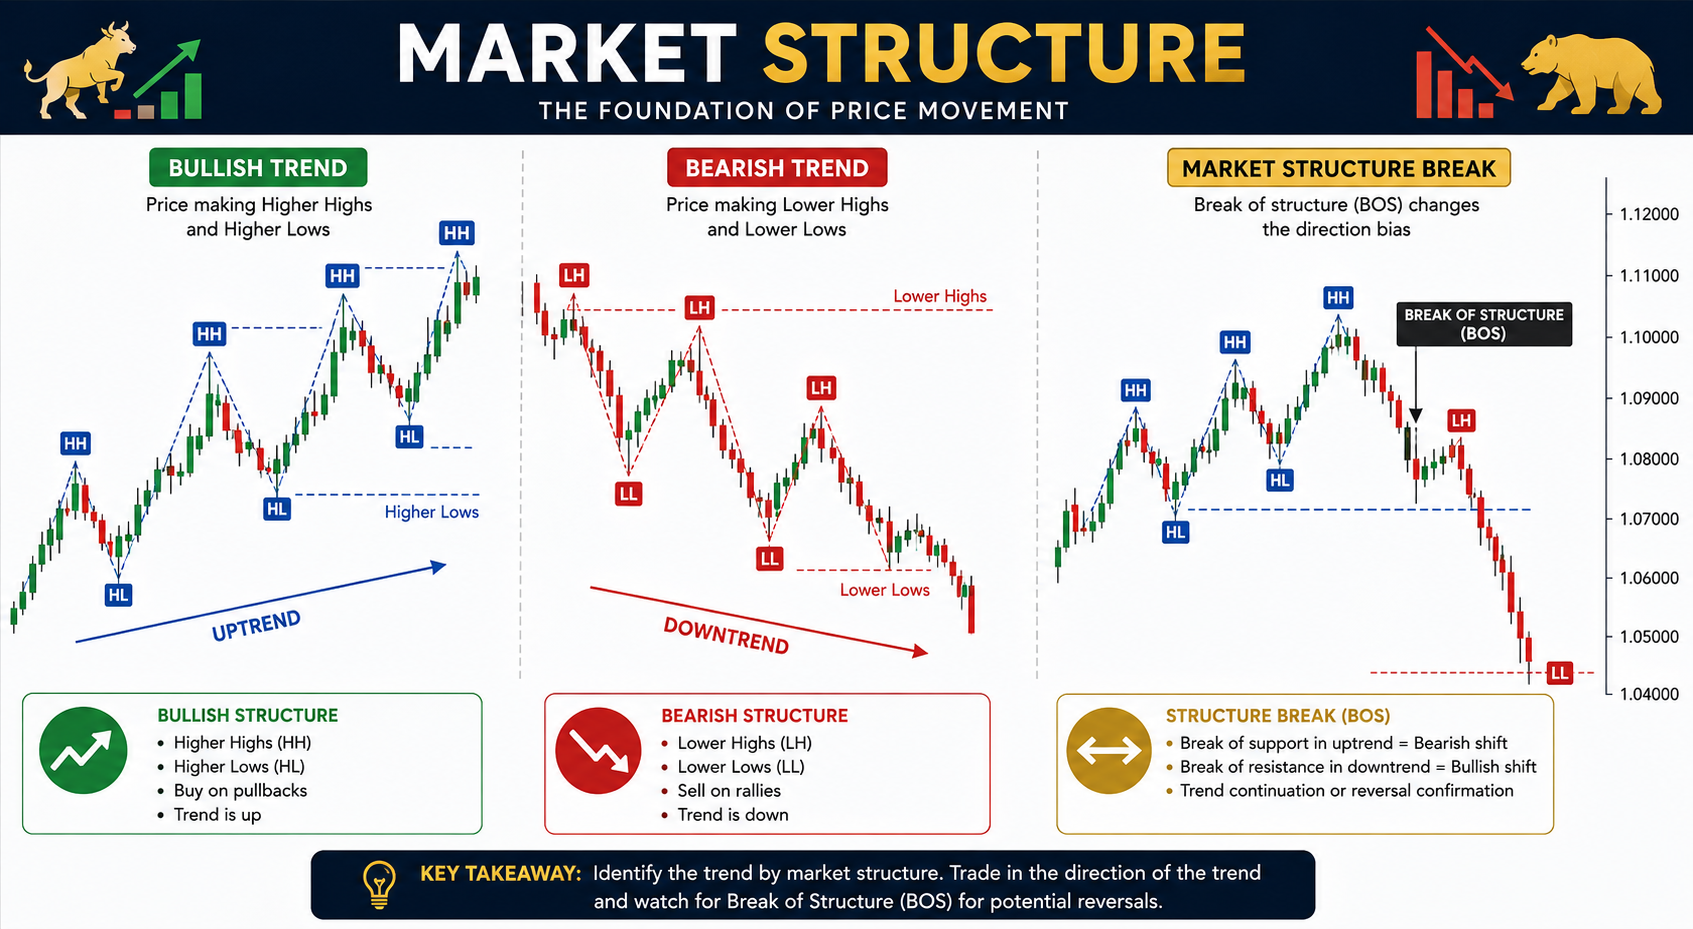
In an uptrend, the market creates:
- Higher Highs (HH)
- Higher Lows (HL)
In a downtrend, the market creates:
- Lower Highs (LH)
- Lower Lows (LL)
A change in market structure occurs when these patterns are broken.
For example:
If the market is creating Higher Highs and Higher Lows but suddenly breaks below a previous Higher Low, it signals potential bearish market structure.
This structural shift is the foundation of Breaker Block formation.
What Exactly is a Breaker Block?
A Breaker Block is a former Order Block that fails and later becomes a support or resistance zone.
In simple words:
- A bullish Order Block fails.
- Price breaks below it.
- The failed bullish Order Block becomes a bearish Breaker Block.
Similarly:
- A bearish Order Block fails.
- Price breaks above it.
- The failed bearish Order Block becomes a bullish Breaker Block.
The logic behind this concept is based on trapped traders.
When traders place positions based on an Order Block and the market moves against them, their stop losses and liquidation create additional momentum in the opposite direction.
Institutions often use these liquidity events to fuel larger market moves.
Image Prompt: Basic Breaker Block Concept
Design a forex chart showing a bullish order block failing and transforming into a bearish breaker block. Highlight trapped buyers, stop-loss hunts, and reversal zones.
Difference Between Order Block and Breaker Block
Many traders confuse Order Blocks and Breaker Blocks.
An Order Block is:
- A zone where institutions originally entered.
- Expected to hold as support or resistance.
A Breaker Block is:
- A failed Order Block.
- Expected to act in the opposite direction.
For example:
Bullish Order Block:
Price returns to the zone and bounces upward.
Bullish Breaker Block:
Price breaks below the zone, returns to retest it, and then continues downward.
This distinction is extremely important because it changes the trader’s directional bias.
Image Prompt: Order Block vs Breaker Block
Split-screen forex chart comparing a successful order block and a failed order block turning into a breaker block. Educational infographic style.
How a Bearish Breaker Block Forms
A bearish Breaker Block develops through a sequence of events.
Step 1:
The market is bullish.
Step 2:
A bullish Order Block forms.
Step 3:
Price moves higher and attracts buyers.
Step 4:
Price suddenly breaks below the bullish Order Block.
Step 5:
Market structure shifts bearish.
Step 6:
Price retraces back to the failed Order Block.
Step 7:
The failed Order Block acts as resistance.
Step 8:
Price continues downward.
This failed bullish Order Block now becomes a bearish Breaker Block.
Image Prompt: Bearish Breaker Block Formation
Create a detailed forex chart illustrating bullish trend, bullish order block, market structure break, retracement, and bearish continuation from the breaker block.
Example of a Bearish Breaker Block
Suppose EUR/USD is trading at 1.1500.
Price forms a bullish Order Block near 1.1450 and rallies to 1.1600.
Most traders believe the market will continue upward.
However:
The market suddenly falls below 1.1450.
This break invalidates the bullish Order Block.
Price later revisits 1.1450.
Instead of bouncing upward, sellers enter aggressively.
The market drops to 1.1300.
The zone around 1.1450 becomes a bearish Breaker Block.
This setup provides an excellent selling opportunity.
Image Prompt: EURUSD Bearish Breaker Example
Professional EUR/USD forex chart showing bearish breaker block setup with entry, stop loss, target, and risk-reward ratio.
How a Bullish Breaker Block Forms
A bullish Breaker Block is the opposite.
Step 1:
The market is bearish.
Step 2:
A bearish Order Block forms.
Step 3:
Price attracts sellers.
Step 4:
Price unexpectedly breaks above the bearish Order Block.
Step 5:
Bullish market structure emerges.
Step 6:
Price retraces back to the failed bearish Order Block.
Step 7:
The zone acts as support.
Step 8:
Price rallies higher.
The failed bearish Order Block becomes a bullish Breaker Block.
Image Prompt: Bullish Breaker Block Formation
Create a forex trading chart showing bearish order block failure, market structure shift, retracement, and bullish continuation from a breaker block.
Example of a Bullish Breaker Block
Assume GBP/USD is trading at 1.2800.
A bearish Order Block forms at 1.2850.
Price initially moves downward.
Suddenly, institutional buying enters the market.
Price breaks above 1.2850.
This invalidates the bearish Order Block.
Later, the market retraces to 1.2850.
Buyers enter aggressively.
The market rallies toward 1.3100.
The former bearish Order Block becomes a bullish Breaker Block.
Image Prompt: GBPUSD Bullish Breaker Example
Detailed GBP/USD chart showing bullish breaker block entry, stop-loss placement, take-profit targets, and institutional buying.
Why Breaker Blocks Work
Breaker Blocks work because they exploit trader psychology.
Most retail traders:
- Buy bullish Order Blocks.
- Sell bearish Order Blocks.
When these zones fail:
- Stop losses are triggered.
- Positions are liquidated.
- New momentum enters the market.
Institutional traders often target these liquidity pools.
The trapped traders unintentionally provide fuel for the new trend.
This is why Breaker Blocks frequently become powerful reversal zones.
Image Prompt: Liquidity and Trapped Traders
Educational forex illustration showing trapped traders, stop-loss clusters, liquidity pools, smart money, and breaker block reversals.
Using Breaker Blocks with Liquidity
The best Breaker Blocks usually form near liquidity.
Liquidity may exist above:
- Previous highs
- Equal highs
- Swing highs
Liquidity may exist below:
- Previous lows
- Equal lows
- Swing lows
Institutions often sweep liquidity first before activating the Breaker Block.
This increases the probability of successful trades.
Professional traders always look for liquidity grabs before entering Breaker Block setups.
Image Prompt: Breaker Block and Liquidity Sweep
Forex chart illustrating equal highs, liquidity sweep, breaker block retest, and market reversal.
Breaker Blocks and Fair Value Gaps
A powerful trading strategy combines:
- Breaker Blocks
- Fair Value Gaps (FVGs)
A Fair Value Gap represents market imbalance.
When a Breaker Block overlaps with a Fair Value Gap, the probability of a successful trade increases significantly.
Many ICT traders use this confluence for precision entries.
The overlap creates a zone where institutional activity is highly likely.
Image Prompt: Breaker Block with Fair Value Gap
Professional trading chart showing Fair Value Gap overlapping with Breaker Block and resulting market reversal.
Entry Rules for Trading Breaker Blocks
A structured trading plan is essential.
For bullish Breaker Blocks:
- Wait for market structure shift.
- Identify the failed bearish Order Block.
- Wait for retracement.
- Enter on confirmation.
- Place stop loss below the zone.
For bearish Breaker Blocks:
- Wait for market structure break.
- Identify failed bullish Order Block.
- Wait for retracement.
- Enter after rejection.
- Place stop loss above the zone.
Patience is critical.
Never chase price.
Always wait for confirmation.
Image Prompt: Breaker Block Trading Strategy
Educational trading chart showing entry, stop loss, take profit, confirmation candle, and risk management.
Common Mistakes Traders Make
Many traders fail because they:
- Ignore market structure.
- Enter before confirmation.
- Trade every Breaker Block.
- Ignore liquidity.
- Use large stop losses.
- Ignore higher timeframes.
A Breaker Block alone is not enough.
Successful traders combine it with:
- Liquidity
- Market Structure
- Fair Value Gaps
- Risk Management
Image Prompt: Breaker Block Trading Mistakes
Forex infographic showing common mistakes such as early entries, lack of confirmation, poor risk management, and ignoring liquidity.
Risk Management When Trading Breaker Blocks
Even the best setup can fail.
Professional traders risk:
- 1% per trade
- 2% maximum per trade
A proper risk-to-reward ratio should be:
- 1:2 minimum
- 1:3 preferred
- 1:5 for strong setups
The goal is consistency rather than winning every trade.
Good risk management allows traders to remain profitable even with moderate win rates.
Image Prompt: Risk Management for Breaker Blocks
Forex trading infographic showing risk-reward ratios, stop losses, position sizing, and capital preservation.
Conclusion
Breaker Blocks are among the most effective Smart Money Concepts used in modern Forex trading. They represent failed Order Blocks that transform into powerful support or resistance zones after a market structure shift. These zones reveal where institutional traders may have trapped retail participants before driving the market in the opposite direction.
By combining Breaker Blocks with liquidity analysis, Fair Value Gaps, market structure shifts, and proper risk management, traders can significantly improve their trading performance. However, no trading concept guarantees success. The key is patience, discipline, and waiting for high-probability setups.
Mastering Breaker Blocks can help traders understand how smart money operates, identify institutional footprints, and trade with greater confidence in the Forex market.
For more information:-
Instagram: https://www.instagram.com/hadyjfx_official
YouTube: https://www.youtube.com/@hadyjmentor7793
Facebook: https://www.facebook.com/profile.php?id=61562232239915
Join Telegram: https://t.me/hadyjfx