
Retail traders often focus on indicators, oscillators, and short-term patterns, while institutions focus on price imbalance. The market does not move because an indicator turns overbought. It moves because large orders create imbalance between buyers and sellers.
The foundation of Supply demand forex trading is understanding where institutional orders previously entered the market and where they are likely to defend positions again. This approach forms the backbone of many advanced strategies often labeled as a Smart money forex strategy.
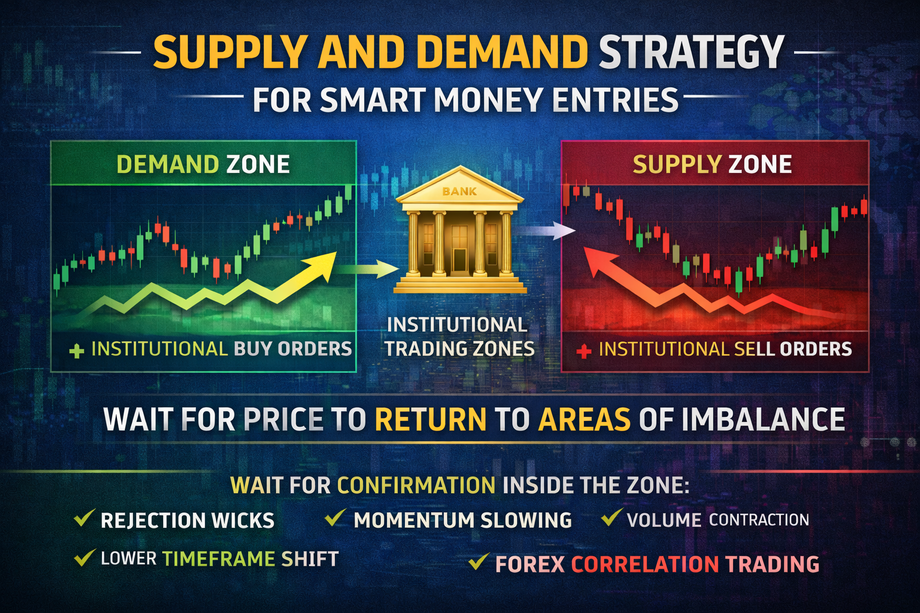
Instead of chasing price, this method waits for price to return to institutional trading zones where imbalance originally occurred.
Understanding Institutional Trading Zones
Institutional participants do not enter positions randomly. They accumulate or distribute positions in areas where liquidity is available. These areas create sharp price moves away from consolidation bases.
A demand zone forms when aggressive buying pushes price upward from a consolidation area. A supply zone forms when strong selling drives price downward rapidly.
These sharp departures indicate that large orders were filled.
In Institutional trading zones, price tends to react again when revisited because unfilled orders may still remain.
This concept transforms trading from guessing breakouts to anticipating reactions at high-probability levels.
Why Supply and Demand Works Across Timeframes
One reason Supply demand forex remains popular is its adaptability. The logic of imbalance applies on every timeframe.
On higher timeframes, zones reflect institutional positioning. On lower timeframes, zones reflect short-term liquidity dynamics.
Swing traders may focus on daily zones. Intraday traders may use 1-hour or 15-minute zones for entries. The concept remains consistent: price reacts where imbalance previously occurred.
This multi-timeframe flexibility makes it one of the most practical components of a structured Smart money forex strategy.
Identifying Valid Supply and Demand Zones
Not every consolidation area qualifies as a true institutional zone. Strong zones share specific characteristics.
First, price leaves the area aggressively with large momentum candles. Second, there is minimal overlap during departure. Third, price does not return immediately.
A weak zone forms when price drifts away slowly or revisits repeatedly.
The strength of a zone depends on the intensity of imbalance that created it.
Precision in identifying valid Institutional trading zones improves win rate significantly.
The Psychology Behind Zone Reactions
When price returns to a previous demand zone, it revisits an area where buyers previously dominated. If institutional participants are defending that level, buying pressure may appear again.
Similarly, when price revisits a supply zone, sellers may re-enter to defend positions.
This repeated behavior creates structured reaction points.
A disciplined Supply demand forex approach understands that price memory exists in areas where large capital was deployed.
Reaction Confirmation Before Entry
One common mistake retail traders make is placing blind limit orders at zones. While this may work occasionally, it increases exposure to deeper retracements.
A refined Smart money forex strategy waits for confirmation inside the zone.
Confirmation may include:
Rejection wicks
Lower timeframe structure shifts
Momentum slowing
Volume contraction
Waiting for confirmation improves timing and reduces premature entries.
Patience increases probability.
Entry Refinement Using Lower Timeframes
Once price reaches a higher timeframe zone, lower timeframe structure provides tactical entry.
For example, if price enters a daily demand zone, a trader may drop to the 15-minute chart to observe:
Break of minor structure
Bullish engulfing candle
Higher low formation
This alignment improves risk-to-reward ratio.
Using this layered method transforms Institutional trading zones into precise execution areas rather than broad guesswork.
Stop Placement and Risk Control
Stops should sit beyond the edge of the zone, not inside it. Placing stops too tight within the zone increases the risk of being taken out by minor volatility.
In a demand zone, stop loss belongs below the lowest structural low of the zone. In a supply zone, stop loss belongs above the highest structural high.
Proper risk placement allows the zone to function as intended without unnecessary exposure.
Risk management defines long-term consistency more than entry perfection.
Why Zones Sometimes Fail
No strategy is flawless. Zones fail when broader market structure shifts or when macro forces override technical levels.
For example, during major central bank announcements or unexpected geopolitical events, price may slice through zones without meaningful reaction.
Context matters.
A zone aligned with higher timeframe trend has greater probability than a counter-trend zone.
Combining structure with macro awareness strengthens any Supply demand forex framework.
Supply and Demand vs Support and Resistance
Many traders confuse supply and demand with traditional support and resistance. While related, they differ in logic.
Support and resistance focus on repeated price interaction. Supply and demand focus on imbalance and order flow.
Support levels may be tested multiple times. True institutional zones often produce strong initial reactions.
Understanding this distinction enhances the depth of a Smart money forex strategy.
Common Mistakes Traders Make
Marking too many zones.
Trading every zone without confirmation.
Ignoring higher timeframe bias.
Placing stops inside zones.
Overleveraging on first touch.
Simplicity improves performance.
Selective zone trading produces better results than constant engagement.
Combining Trend and Supply Demand
The highest probability setups occur when trend continuation aligns with fresh demand or supply zones.
In an uptrend, demand zones are stronger. In a downtrend, supply zones dominate.
Counter-trend zone trading requires faster management and tighter expectations.
Aligning Institutional trading zones with broader structure increases probability dramatically.
The Role of Liquidity Within Zones
Zones often coincide with liquidity pools. Stops from previous traders accumulate around prior highs and lows. When price returns, liquidity is absorbed before reversal.
Understanding liquidity improves reaction timing.
This integration of imbalance and liquidity forms the advanced layer of a Smart money forex strategy.
Why This Strategy Appeals to Retail Traders
The visual clarity of zones makes the approach accessible. Traders can see imbalance clearly on charts without complex indicators.
However, simplicity does not mean ease. Discipline, confirmation, and patience are required.
Used correctly, Supply demand forex provides a structured framework for anticipating institutional behavior rather than reacting emotionally.
Final Thoughts
The Supply demand forex approach is not about predicting every reversal. It is about identifying areas where imbalance previously shifted price and waiting for high-probability reactions.
A structured Smart money forex strategy focuses on institutional order zones, confirmation inside those zones, and refined entry execution.
Markets move because of capital flow. Institutional trading zones reflect where that capital previously entered.
When traders align with those zones, structure improves. When they chase price away from imbalance, risk increases.
Discipline, confirmation, and structure turn supply and demand into a powerful long-term trading framework.
Visit our Social media pages:
https://www.instagram.com/hadyjfx_official
/https://www.youtube.com/@hadyjmentor7793
https://www.facebook.com/profile.php?id=61562232239915
Join our free telegram channel:
https://t.me/hadyjfx