In the forex market, price moves based on imbalance between buyers and sellers. While many traders rely on indicators, professional traders focus on areas where large orders are placed. These areas are known as supply and demand zones. Understanding how to identify and trade these zones can significantly improve trading accuracy and risk reward ratio. This is where supply and demand trading strategy, institutional zone trading, and high RR forex setups become essential.
Most retail traders enter trades randomly without understanding where institutions are active. This leads to poor entries and unnecessary losses. Supply and demand zones provide a structured way to trade by focusing on areas where price is most likely to react. By mastering supply and demand trading strategy, institutional zone trading, and high RR forex setups, traders can align with smart money and improve consistency.
What is Supply and Demand in Forex
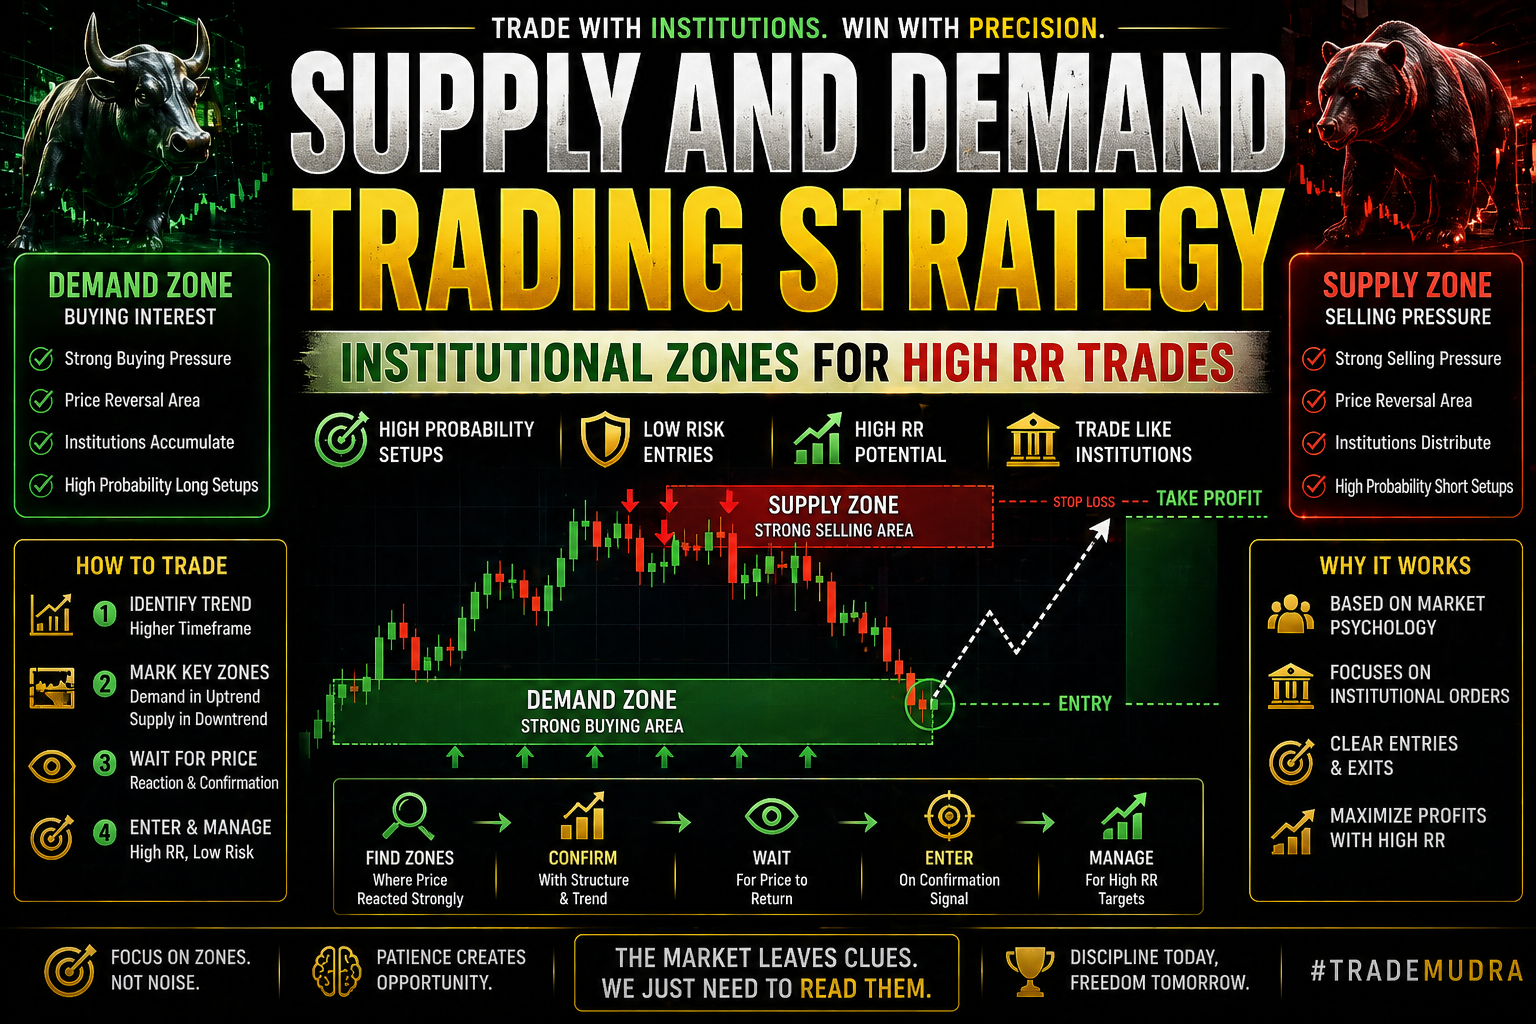
Supply and demand represent the balance between sellers and buyers in the market. When demand is stronger than supply, price moves upward. When supply is stronger than demand, price moves downward.
Supply zones are areas where selling pressure is strong, causing price to drop. Demand zones are areas where buying pressure is strong, causing price to rise.
These zones are created by institutional activity. Large players place significant orders in these areas, which leads to strong price reactions. This concept is central to supply and demand trading strategy, institutional zone trading, and high RR forex setups.
Why Supply and Demand Zones Work
Supply and demand zones work because they reflect real market behavior. Institutions cannot execute large trades instantly, so they build positions in specific areas.
When price returns to these zones, institutions often continue their activity, causing price to react again. This creates high-probability trading opportunities.
Unlike indicators, which lag behind price, supply and demand zones provide real-time insights. This makes supply and demand trading strategy, institutional zone trading, and high RR forex setups highly effective.
Difference Between Support Resistance and Supply Demand
Many traders confuse supply and demand with support and resistance. While they are related, they are not the same.
Support and resistance are horizontal levels where price reacts. Supply and demand are zones where strong buying or selling occurred.
Supply and demand zones are more dynamic and reflect institutional activity. They provide deeper insights compared to simple support and resistance.
Understanding this difference is important for applying supply and demand trading strategy, institutional zone trading, and high RR forex setups.
Types of Supply and Demand Zones
There are mainly two types of zones: supply zones and demand zones.
Supply zones are formed when price drops sharply after a consolidation. These zones act as resistance.
Demand zones are formed when price rises strongly after consolidation. These zones act as support.
Another classification includes fresh zones and tested zones. Fresh zones are more reliable because price has not revisited them yet.
These types are essential for mastering supply and demand trading strategy, institutional zone trading, and high RR forex setups.
How to Identify Strong Zones
Not all zones are equal. Strong zones have specific characteristics.
They are formed after strong impulsive moves, indicating institutional involvement. They often break market structure, confirming their importance.
Strong zones have little or no overlap with previous price action. They are clean and well-defined.
These factors help traders identify high-quality setups using supply and demand trading strategy, institutional zone trading, and high RR forex setups.
Market Structure and Zone Alignment
Market structure plays a key role in supply and demand trading.
In an uptrend, traders should focus on demand zones for buying opportunities. In a downtrend, supply zones are more relevant.
Trading in alignment with market structure increases the probability of success.
This combination strengthens supply and demand trading strategy, institutional zone trading, and high RR forex setups.
Entry Strategy Using Supply and Demand
A proper entry strategy is essential for success.
First, identify the overall trend using market structure. Then, mark key supply and demand zones on the chart.
Wait for price to return to these zones. Do not enter trades blindly.
Look for confirmation such as rejection candles, liquidity sweeps, or break of structure.
This approach aligns with supply and demand trading strategy, institutional zone trading, and high RR forex setups.
Risk Reward Advantage of Zone Trading
One of the biggest advantages of supply and demand trading is high risk reward ratio.
Entries are taken near the edges of zones, allowing tight stop losses. Targets are usually far from the entry point.
This creates favorable risk reward setups, often 1:2 or higher.
This benefit makes supply and demand trading strategy, institutional zone trading, and high RR forex setups highly attractive.
Stop Loss and Take Profit Placement
Stop loss placement should be logical and based on zone structure.
For demand zones, stop loss is placed below the zone. For supply zones, it is placed above the zone.
Take profit levels can be set at opposing zones or key liquidity levels.
Proper placement ensures effective risk management in supply and demand trading strategy, institutional zone trading, and high RR forex setups.
Multi-Timeframe Approach
Using multiple timeframes improves accuracy.
Higher timeframes provide strong zones and overall trend. Lower timeframes offer precise entry points.
For example, a trader may identify a demand zone on the 4-hour chart and enter on the 5-minute chart.
This approach enhances supply and demand trading strategy, institutional zone trading, and high RR forex setups.
Combining Supply Demand with Smart Money Concepts
Supply and demand zones become more powerful when combined with smart money concepts.
Liquidity sweeps, order blocks, and fair value gaps can provide additional confirmation.
For example, a demand zone combined with a liquidity sweep increases the probability of a bullish move.
This combination strengthens supply and demand trading strategy, institutional zone trading, and high RR forex setups.
Common Mistakes Traders Make
Many traders mark too many zones, leading to confusion.
Another mistake is trading weak zones without confirmation.
Ignoring market structure and overtrading are also common issues.
Avoiding these mistakes is crucial for mastering supply and demand trading strategy, institutional zone trading, and high RR forex setups.
Psychology Behind Zone Trading
Supply and demand trading reflects market psychology.
Demand zones represent strong buying interest, while supply zones represent strong selling pressure.
Understanding this psychology helps traders anticipate price movements.
This insight supports supply and demand trading strategy, institutional zone trading, and high RR forex setups.
Advantages of Supply and Demand Strategy
This strategy provides clear entry and exit points.
It aligns traders with institutional activity and improves risk reward ratio.
It also reduces reliance on indicators and simplifies trading.
These advantages make supply and demand trading strategy, institutional zone trading, and high RR forex setups highly effective.
Limitations of the Strategy
Despite its strengths, this strategy requires practice.
Beginners may struggle to identify valid zones.
Market conditions can also affect performance, especially in ranging markets.
Understanding these limitations helps traders apply supply and demand trading strategy, institutional zone trading, and high RR forex setups effectively.
Building Consistency with Zone Trading
Consistency comes from following a structured approach.
Traders should stick to their rules and avoid emotional decisions.
Keeping a trading journal can help track performance and improve strategy.
This discipline supports long-term success in supply and demand trading strategy, institutional zone trading, and high RR forex setups.
Conclusion
Supply and demand trading is one of the most powerful ways to understand the forex market. By focusing on institutional zones, traders can identify high-probability setups and improve risk reward ratio.
Mastering supply and demand trading strategy, institutional zone trading, and high RR forex setups requires patience, discipline, and practice.
In the end, trading is not about predicting the market but understanding where smart money is active. Those who learn to trade from these zones gain a significant edge in the market.
For more information:-
Instagram: https://www.instagram.com/hadyjfx_official
YouTube: https://www.youtube.com/@hadyjmentor7793
Facebook: https://www.facebook.com/profile.php?id=61562232239915
Join Telegram: https://t.me/hadyjfx